How to Rebuild Your Brake Calipers
- Mar 3, 2020
- 6 min read
Updated: Dec 23, 2020
Not your regular maintenance task but sometimes and especially on older pigs, you need to freshen up what helps you slow you down!

What entails "rebuilding" a brake caliper actually?
The Nissin calipers on the DR650 are quite simple and rebuilding them is an easy task that does not require any special tools.
The main goal is to clean everything, inspect and replace worn out parts.
This is mainly the seals, possibly the pistons, sliding pins, and boots as well as the brake pad retainer pins.
When is a good time to rebuild your calipers?
When they are leaking obviously. Even if only a very small amount of brake fluid is found on the caliper, it is only a matter of time before a major brake failure happens. Check if the leak comes from the piston(s) area ASAP!
When upgrading your braking system. Ok, you've come to the point where you want to improve the humble brake performance of your pig. Whether it is new lines, rotors, and pads, it's always a good time to make your calipers working like new again.
When you have them completely apart anyway! Like if you are doing a paint job, you might as well reassemble them with new seals.
When a DR650 has sats for years, all seals can eventually dry and fail so check them out at least!
Here is the complete tutorial to rebuild the front or back brake calipers on the Suzuki DR650.
Preliminary tasks
This operation requires to remove the calipers off the bike.
The front only needs a 12mm wrench to take it off the fork but you need to remove the rear wheel to take out the rear caliper.
Remove the brake pads first if you plan on using them again to prevent contamination with brake fluid. You need a flat screwdriver and a 6mm Allen key.
Remove the banjo bolt with a 12mm wrench to detached the brake line. Be ready with rags and a pan to catch the fluid.
Take the calipers to your bench or other clean working space.
Tools and supplies needed
Pick tool and a small flat screwdriver
Compress air with blowgun or a bike pump and a nozzle for inflatable toys
Brake fluid DOT4 or 5.1 (not 5!)
Brake caliper grease (from any automotive store) or also called High-temperature silicone grease. (Napa carry one called EZ-slide for example)
Parts (seals kit, pistons, sliding pins, boots depending on what's needed)
Shop rags and pan
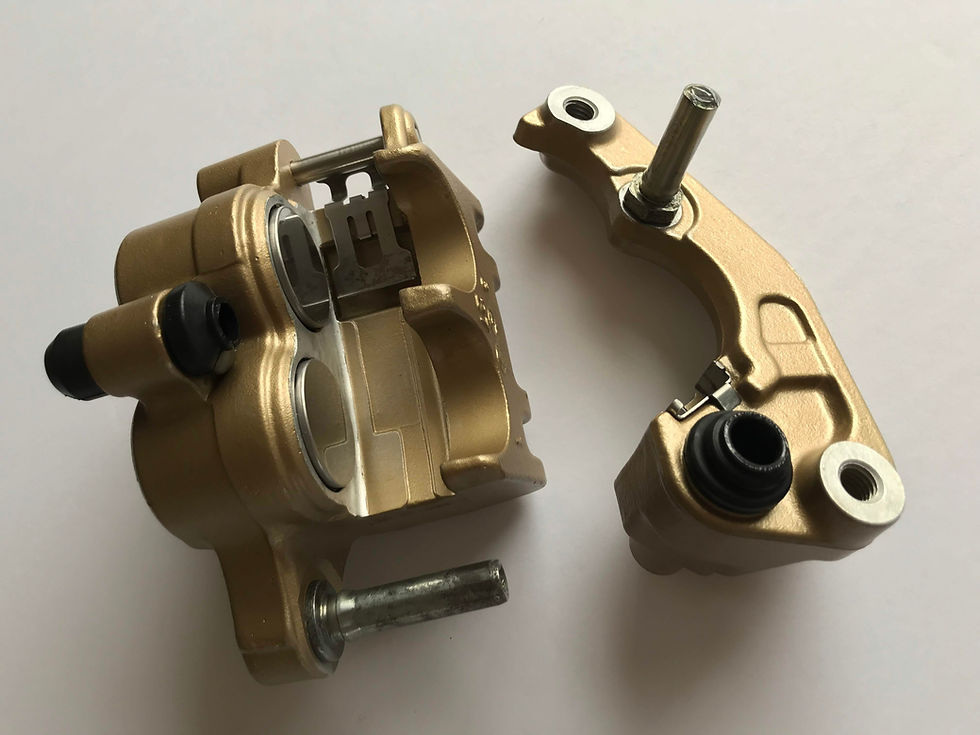
Step1: Disassemble

Once the front or rear caliper on the bench, you can remove them from their bracket like shown in the picture beside.
The rear is that large cast aluminum piece where the axle goes through while the front is a smaller piece that attaches to the fork.
Gently pull the caliper sideway while holding the bracket until it pops out of the 2 sliding pins located at the top and bottom.
Use a rag and small flat screwdriver to clean the old grease from the pins and inside the rubber boots attached to the caliper.
Just wipe it clean, do not use aggressive solvent as you could swell and damage the rubber.
Now, the right way to remove the pistons from the calipers is to build up pressure from the inside. But there is no brake fluid to do that so you need to use air.
Don't have an air compressor? You can remove the pistons with a simple bike pump!

Note: You can find some "piston removal tool" like this Motion Pro here but it will only work for the rear caliper on the DR.
The front pistons are not hollow so you can't use this tool for them.
The air method has the advantage to be fast and universal. It does work with any type of calipers and pistons.
Do not try to remove the piston with a plier or any mechanical method from the outside as you will most likely damage them.
The rear piston is made of steel but the front ones are made of some Bakelite plastic with a thin sheet metal cap.
Start by stuffing a rag inside the caliper to prevent the piston to pop out too fast and get damaged by hitting the other side.

If you have a compressor just start to blow air slowly into the brake line port in the caliper.
If you don't, you can use a bike pump (a floor one is better but a smaller one might do the trick as well) and one of those white plastic nozzle that usually comes with to inflate pool toys and the like.
You probably need to cut the tip so it doesn't hit the inside before sealing against the port thread. Being plastic, you can force screw it into the port for better sealing.
Then try a quick push on the pump to build pressure until it can pop the piston out.
Go gentle at first and increase speed of push if not working.

The front caliper having 2 pistons, you need to push them both out at the same time.
The chambers are connected, so if you let one out completely, you won't be able to build pressure for the other one.
Just hold something flat like a wrench against them with your hand as they come out simultaneously.
Then you can finish by hand to take them out.
Step2: Inspect and clean
Do not remove the seals if they were not leaking and if you do not plan on replacing them! You may damage them and it's recommended to install new ones if removed.
Note: When ordering Suzuki OEM parts, you can either buy the seals only (set of dust seal and seal) or the complete kit (piston(s) and seals).
The reference number for the front complete kit is 59300-27840 (2 pistons and 4 seals) and the rear is 69100-43830 (1 piston and 2 seals) as shown in the pictures.
To remove the seals, grab the pick tool or even better a wooden toothpick to pull the dust seal (thin one) and the seal (thick one) out of their grooves.
Be careful not to scratch any surfaces inside the caliper bores and look for any nicks and other damage on pistons walls as well.


While you are at it, also inspect the following parts on the calipers to confirm they are good for duty:
Brake pads springs (small shiny sheet metal piece)
They should clip in well on the caliper and not look bent or rusty. Clean with a wire brush gently or replace it if needed.
Sliding pins and boots
If they were fairly dry inside, check for corrosion, the pins can be sanded smooth or replaced. Any torn boots will need to be replaced so they can keep the grease in.
Brake pad retainer pins
After a few years, they are usually in rough shape. They could be fairly rusted with a gritty surface and they can be bent (especially the rear ones which are longer)
Considering that your pads are supposed to slide smoothly on them, it is also important to replace them too. Or even better, get our Titanium replacement pins!
They will never rust or bend while keeping a perfect slick surface forever.

Step3: Rebuild!
Once all is check and ready to be reassembled, pour some fresh brake fluid in the bottle cap and apply generously inside the caliper bore(s) with your finger.
Everywhere should be wet, especially the grooves and also dip the new seals in the DOT4 before installation.


Then carefully insert the new seals in their groove by hand, making sure they sit inside properly.
Apply some brake fluid on the piston(s) wall before pushing them into the bore(s).
Try to keep them really square at first helps. It might be quite hard to pass the thick seals but if properly lubed with brake fluid they will go in.
Push them all the way in, once past the seal's tight spot.
You are almost done!
The last part is to re-apply the brake grease on the sliding pins and inside the rubber boots. You can be generous here as long as the grease stays in. This will help keeping your caliper to auto-center on the disc as the pads are worning out.
Then simply push the caliper back on the bracket by inserting the upper and lower sliding pins into their chambers. Clip the rubber boots on their groove and check that the caliper are sliding left/right smoothly.
You can now re-install the brake pad springs and brake pads before installing the caliper back on the bike.
Last but not least, fill your master cylinder with new DOT4 fluid and do a proper bleed.
Remember to pump and test your brakes a few times before riding away.
Happy trails and safe braking!
#howtorebuildbrakecaliper #betterbrakeonthedr650 #brakerebuild #brakepistonreplacement #dr650brakejob
Comments